Whatever software you use to process your Raw files it can sometimes be difficult to get the look you really want. You’ve got the skills to get the shot, but when you look at the photo it lacks the feeling you felt when you shot it.
When the processing isn’t quite right it can really let the image down. Photos can just lack a certain something, they look too clinical and lack the romance that film has. I have been working with Adobe Lightroom for years now and I have been developing various develop presets in both colour and black and white.
The colour look I have been perfecting is very much based on the print film Kodak Portra. This film has a wonderful quality which is super flattering for portraits and looks great for contemporary landscapes but also works well for weddings and commercial work.
Getting the colours near to what this film offers isn’t straight forward though and takes a lot of work, even sometimes shooting an image with the film and with digital and processing the digital to look like the film scan. GEEK!!!
Unfortunately in my experience there seems there is no one-preset-fix for all images. That is why I have developed a set of 10 colour presets that give the look and feel of Kodak Portra. Just simply try them and see which best suits your images. You’ll probably find that you end up using 3 or 4 most often that give you the look you want.
For black and white images I like a few different films from Ilford Delta 400 to more high contrast and grainy films like Ilford Delta 3200 . So I have developed 10 different black and white Lightroom develop presets that go from low contrast and low grain to high contrast and high grain. Black & white presets will be available soon.
Colour: Shotage Portra

All 10 ‘Shotage Portra’ Lightroom develop presets are available at the special offer price of just £5.
Please see examples below. Remember that a preset will not give you the same effect on different images.

LR Preset: Shotage Portra
£10.00
£5.00
You save £5.00 (50%)!
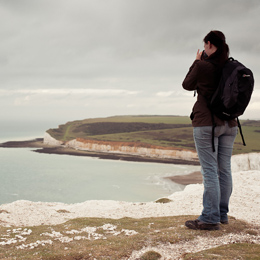
Original Image:

With ‘Shotage Portra #1′ Preset applied:

With ‘Shotage Portra #2′ Preset applied:

With ‘Shotage Portra #3′ Preset applied:

With ‘Shotage Portra #4′ Preset applied:

With ‘Shotage Portra #5′ Preset applied:

With ‘Shotage Portra #6′ Preset applied:

With ‘Shotage Portra #7′ Preset applied:

With ‘Shotage Portra #8′ Preset applied:

With ‘Shotage Portra #9′ Preset applied:

With ‘Shotage Portra #10′ Preset applied:

Original image:

With ‘Shotage Portra #1′ Preset applied:

With ‘Shotage Portra #2′ Preset applied:

With ‘Shotage Portra #3′ Preset applied:

With ‘Shotage Portra #4′ Preset applied:
With ‘Shotage Portra #5′ Preset applied:

With ‘Shotage Portra #6′ Preset applied:

With ‘Shotage Portra #7′ Preset applied:

With ‘Shotage Portra #8′ Preset applied:

With ‘Shotage Portra #9′ Preset applied:

With ‘Shotage Portra #10′ Preset applied: